Building a WhatsApp Chatbot with Express and OpenAI
Introduction
In the on-demand world we live in, the expectation is that everything is just a click away. Users expect quick and easy access to information 24X7 regardless of the time or time zone. As a result, chatbots have become increasingly popular for automating customer interactions. A chatbot is a software agent that simulates human-like conversations with users via chat. Its key task is to answer user questions with instant messages.
Role of Large Language Models (LLM) in Artificial Intelligence (AI)
Of late, usage of LLMs has increased in the area of AI because LLMs are capable of revolutionizing the way chatbots support communication with humans, offering exciting possibilities to enhance overall customer experience.
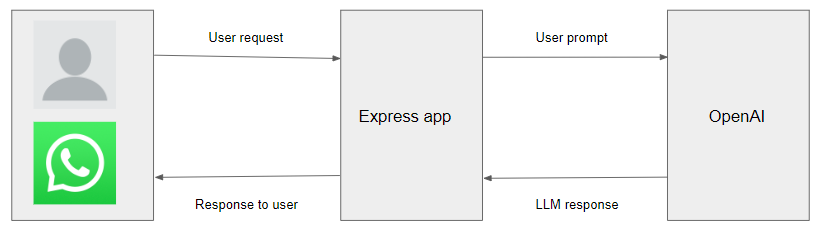
In this blog, we will review the role of LLMs in transforming the way we interact with technology. Specifically, we will focus on building a WhatsApp Chatbot using Express, the WhatsApp API, and powerful OpenAI models. This integration allows us to tap into the vast knowledge and linguistic capabilities of LLMs, enabling our chatbot to engage with humans in dynamic and meaningful conversations. The objective of this blog is to showcase how easy it is to build a working chatbot powered by OpenAI to handle the task of responding to users’ messages.
Prerequisites
In order to build a similar chatbot, the following prerequisites need to be installed your computer:
I. Node.js and npm (Node Package Manager) - to install and run the required libraries and packages.
II. Ngrok - to test WhatsApp webhook
III. Meta App - to access WhatsApp APIs and set up a webhook (details discussed in the following sections)
In general, Low-Code and Codeless frameworks have following advantages:
Step1: Setting up Meta App
-
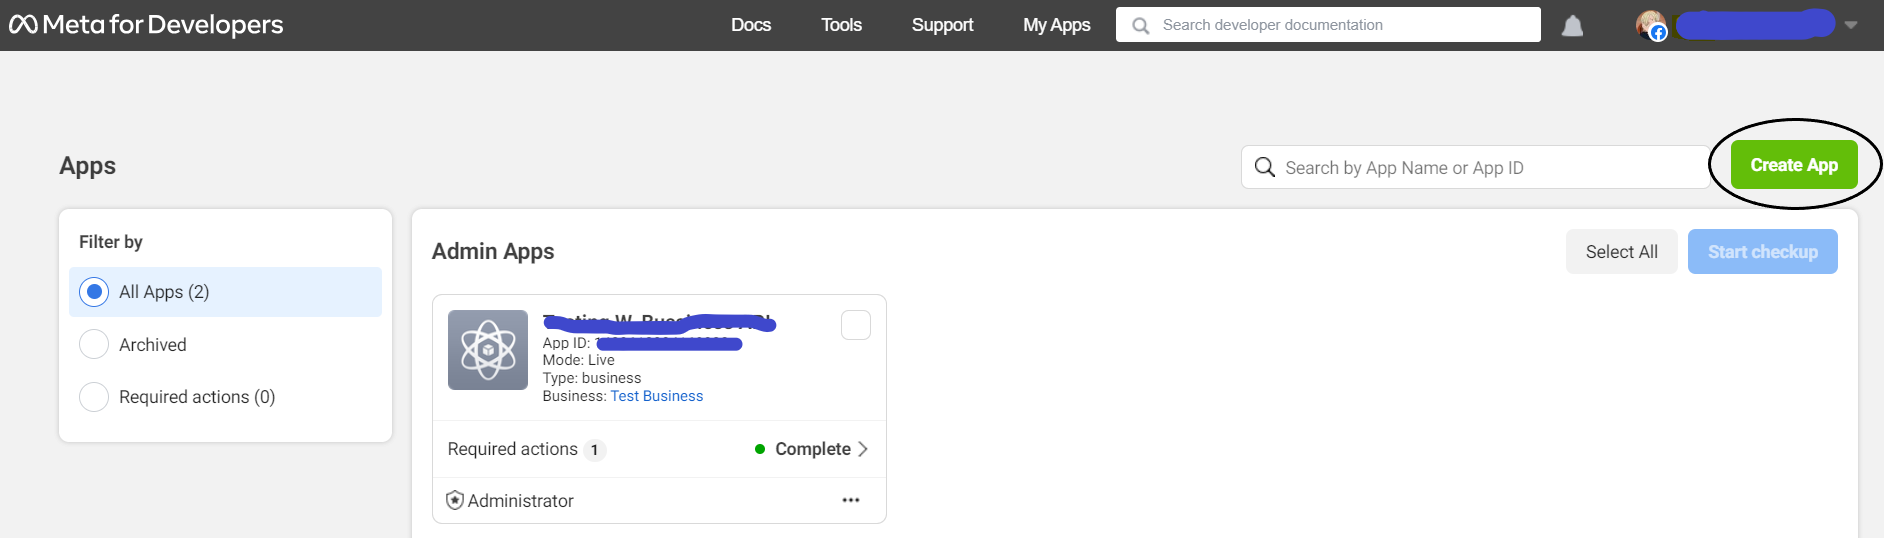
Create a Meta for Developers account and log in. Click on the button on the top right to Create a new App.
-
Once the App is created, subscribe to a version of the messages API.
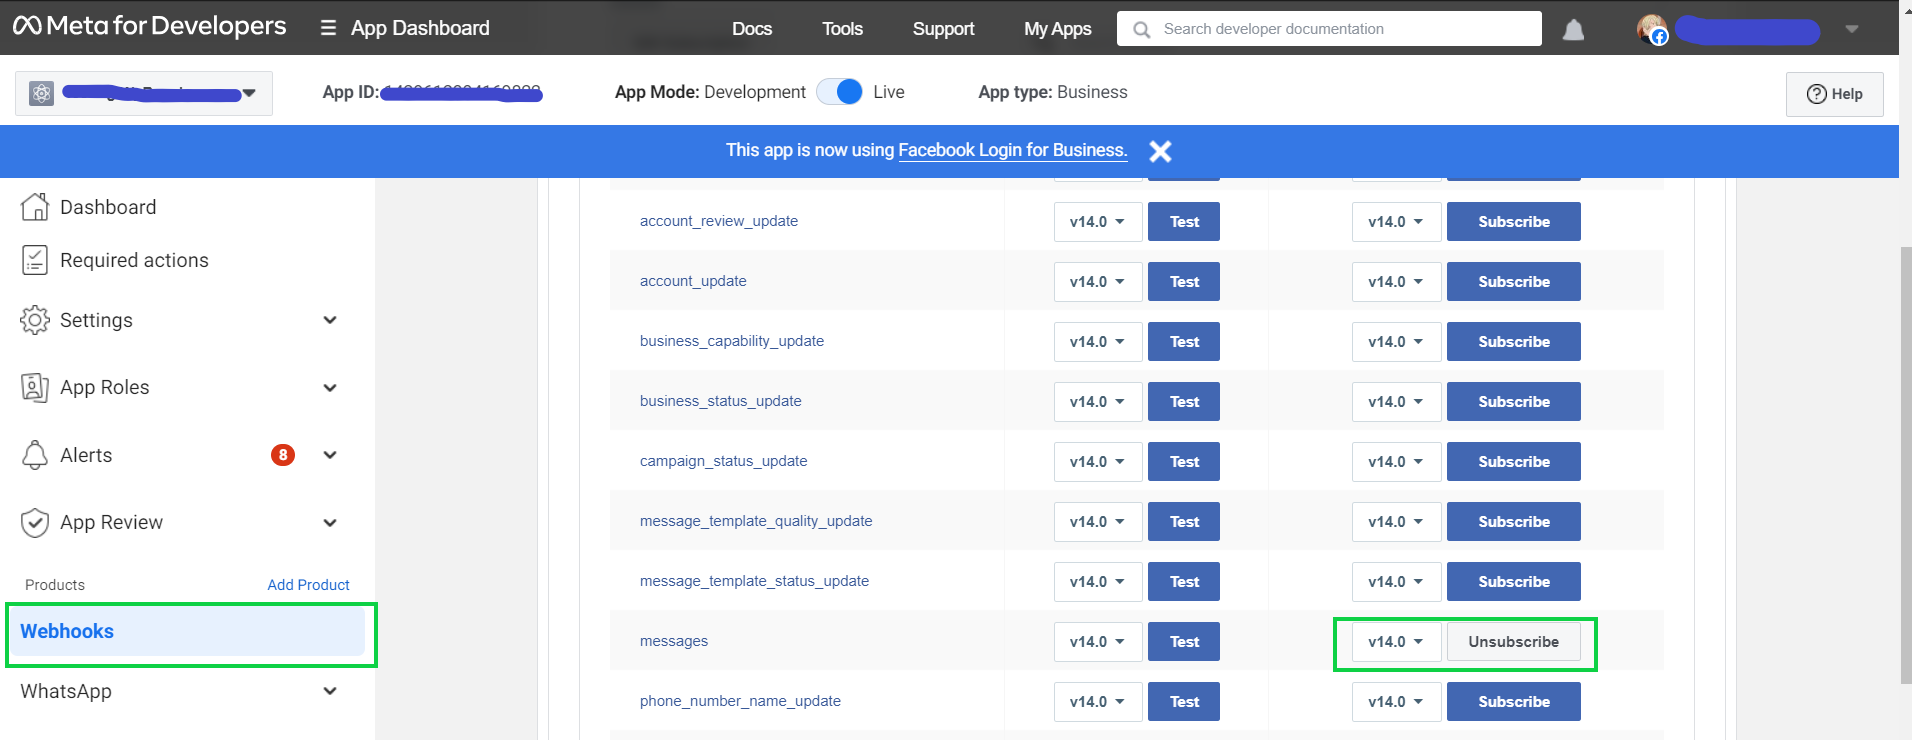
For the purpose of this exercise, we subscribed to
'v14.0'version of the'messages'API. -
Generate a temporary access token that is required for accessing the API. The generated
'Test number'is the number that will be used for testing your app.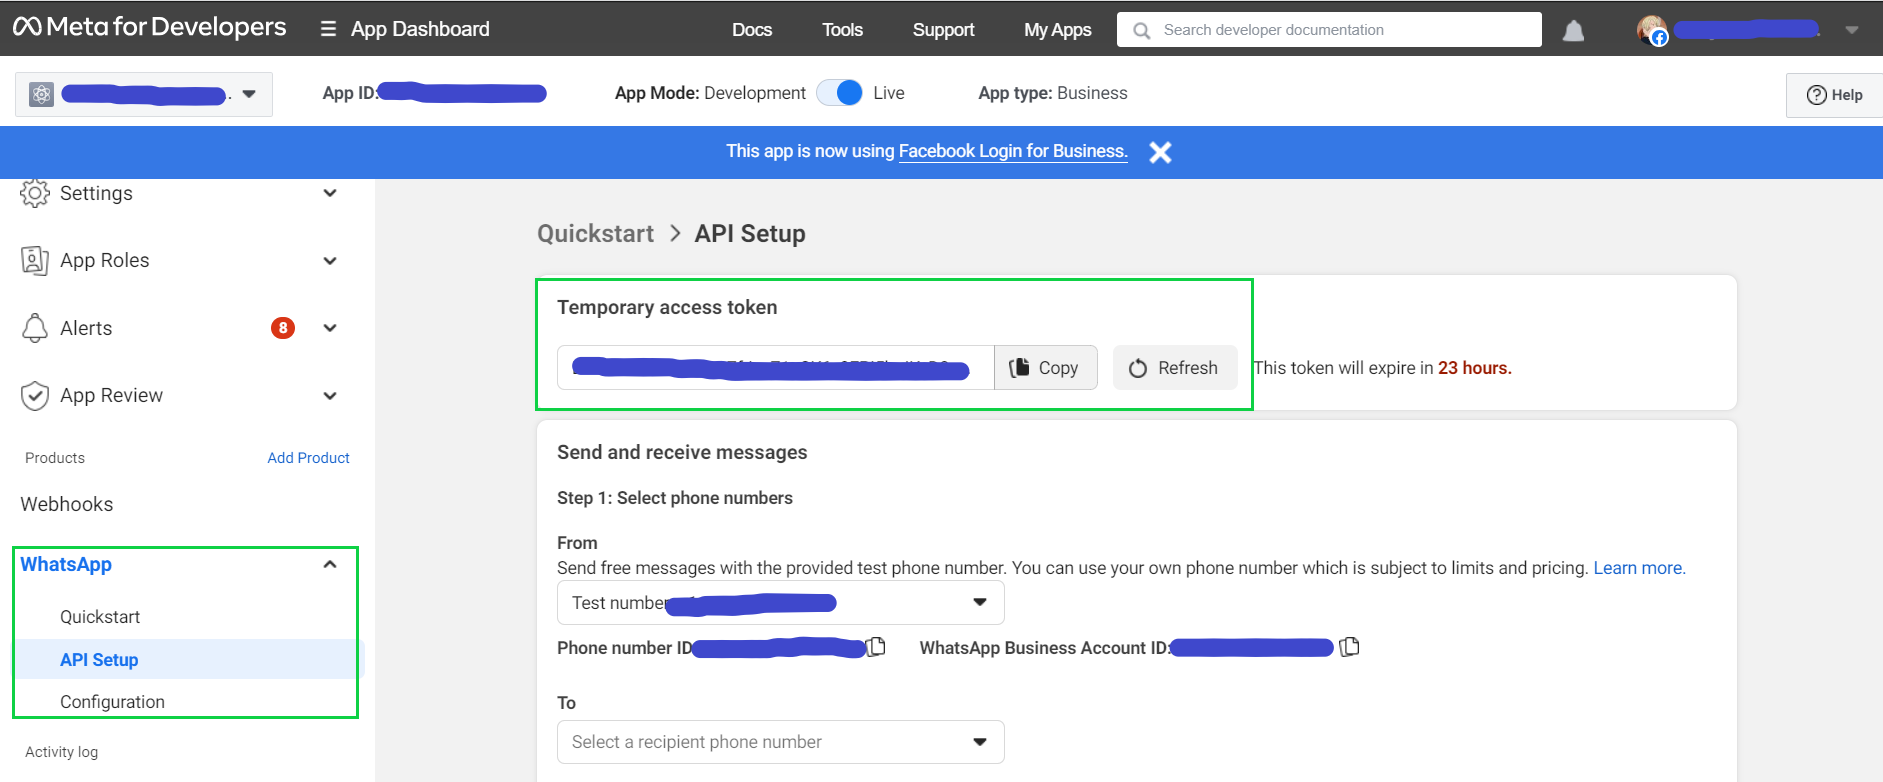
Step 2: Project Setup:
-
Create a new directory for your project and navigate into it:
$ mkdir whatsapp-chatbot $ cd whatsapp-chatbot -
Initialize a new Node.js (TypeScript) project:
$ npm init -y $ npm install typescript --save-dev $ npm install @types/node --save-dev -
Create a tsconfig.json and add the following:
{ "compilerOptions": { "target": "es5", "module": "commonjs", "lib": ["es6"], "allowJs": true, "outDir": "build", "rootDir": "src", "strict": true, "noImplicitAny": true, "esModuleInterop": true, "resolveJsonModule": true }, "include": [ "src/**/*" ], "exclude":[ "node_modules" ] } -
Create
srcfolder andindex.tsfile$ mkdir src $ touch src/index.ts -
Install the required dependencies:
$ npm install express body-parser needle openai @types/needle @types/express --save -
In the
package.jsonfile, add the following key-value:"scripts": { "build": "tsc", "start": "tsc && ts-node --files ./src/index.ts"}
Step 3: Building the Chatbot Server
Now that the setup is complete, let’s begin with creating our chatbot server. We shall create the server code to handle the incoming messages from WhatsApp and interact with OpenAI to generate appropriate responses.
Step 3.1: Create an Express App
The code below is importing the required libraries and creating an Express app. The app is then configured to parse JSON using the body-parser middleware.
Add the following code to index.ts:
 import express, { Request, Response } from 'express';
 import bodyParser from 'body-parser';

 const app = express();
 const port = 3000;

 app.use(bodyParser.json());

 // Route for WhatsApp webhook authentication
 app.get('/whatsapp/webhook', (req: Request, res: Response) => {
  // Handle WhatsApp webhook verification here
  // ...
 });

 // Route for receiving requests from WhatsApp
 app.post('/whatsapp/webhook', async (req: Request, res: Response) => {
  // Handle the webhook payload here
  // ...
 });

 // Start the server
 app.listen(port, () => {
  console.log(`Server is running on port ${port}`);
  });
Step 3.2: Handle webhook verification
Next, implement the route for handling WhatsApp webhook verification. When you set up a WhatsApp webhook, WhatsApp sends a verification request to your server to verify the webhook URL.
// Route for WhatsApp webhook authentication
app.get('/whatsapp/webhook', (req: Request, res: Response) => {
  try {
    const keys = Object.keys(req.query);
    let challenge = '';
    for (let i = 0; i < keys.length; i++) {
      if (keys[i] === 'hub.challenge') {
        challenge = req.query[keys[i]] as string;
      }
    }
    return res.status(200).send(challenge);
  } catch (error) {
    console.error('Error handling webhook verification', error);
    return res.sendStatus(500);
  }
});
Note - the hub.challenge parameter is retrieved from the query string sent by WhatsApp during the verification process. The challenge value is sent as response back to complete the verification.
Step 3.3: Handle Incoming WhatsApp Messages
The next step is to implement the route for handling incoming messages from WhatsApp. A combination of WhatsApp API, OpenAI and needle library are used for sending messages.
const { Configuration, OpenAIApi } = require("openai");
import needle from 'needle';

// Route for receiving requests from WhatsApp
app.post('/whatsapp/webhook', async (req: Request, res: Response) => {
  try {
    // Extract the user's message from the request payload
    const userPrompt = req.body?.entry?.[0]?.changes?.[0]?.value?.messages?.[0]?.text?.body;
    const statuses = req.body?.entry?.[0]?.changes?.[0]?.value?.statuses;

    if (statuses) {
      res.sendStatus(200);
    } else {
      // Send the user's message to OpenAI for generating a response
      const openai = new OpenAIApi(new Configuration({ apiKey: 'YOUR_OPENAI_API_KEY' }));
      const createCompletion = await openai.createCompletion({
        model: 'text-davinci-003',
        prompt: userPrompt,
        temperature: 0,
        max_tokens: 100,
        top_p: 1.0,
        frequency_penalty: 0.0,
        presence_penalty: 0.0,
      });

      // Get the response from OpenAI
      const chatbotResponse = createCompletion.data.choices[0]?.text;

      if (!chatbotResponse) {
        throw new Error('Failed to generate chatbot response');
      }

      // Send the response back to the user
      const options = {headers:{
        'Content-Type': 'application/json',
        'Authorization': `Bearer <WhatsApp Token>`
      }};
      const data = {
        "messaging_product" : "whatsapp",
        "recipient_type"    : "individual",
        "to"                : "RECIPIENT_PHONE_NUMBER",
        "type"              : null,
        "text"              : {
            "body" : chatbotResponse
        }
      }
      const response = await needle('post', 'https://graph.facebook.com/v14.0/PHONE_NUMBER_ID/messages', JSON.stringify(data),options)

      if (response.statusCode === 200 || response.statusCode === 201)
      {
        console.log('Message sent successfully');
        res.sendStatus(200);
      } else {
        throw new Error('Failed to send message');
      }
    }
  } catch (error) {
    console.error('Error handling webhook request', error);
    res.sendStatus(500);
  }
});
The code snippet above extracts the user’s message from the request payload and sends it to OpenAI using the openai.createCompletion method. The OpenAI request is configured with the right parameters required to generate an appropriate chatbot’s response.
Once a response is received from OpenAI, the WhatsApp API is used to send the appropriate response back to the user. Replace 'YOUR_OPENAI_API_KEY' with the actual OpenAI API key, and 'PHONE_NUMBER_ID' , 'RECIPIENT_PHONE_NUMBER' and <WhatsApp Token> with an appropriate WhatsApp phone number, phone number, and Temporary access token.
Step 4: Running the Chatbot Server
Start a ngrok server before starting the App.
$ ngrok http 3000
To run the chatbot server, execute the following command:
$ npm run start
The following message on should be received in the console:
Server is running on port 3000
Step 5: Verify WhatsApp Webhook
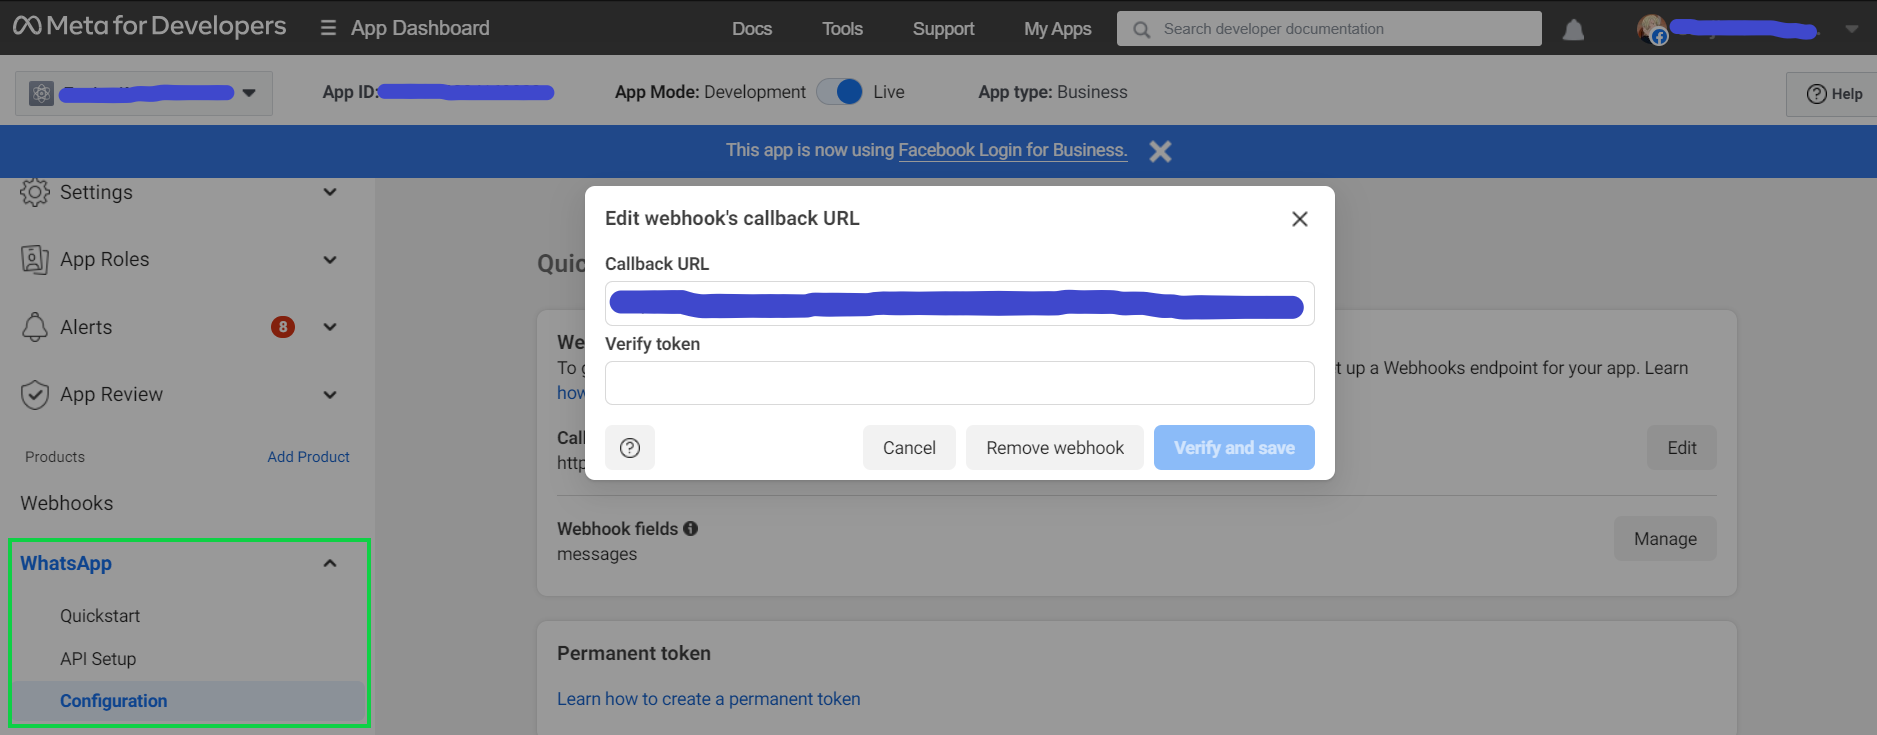
Enter '<ngrok url>/whatsapp/webhook' in the 'Callback URL'. When any message is entered as a token and clicked on 'verify and save', according to Handling WhatsApp Webhook Verification: the endpoint set in the 'Callback URL' will be saved as a webhook.
Testing the Chatbot
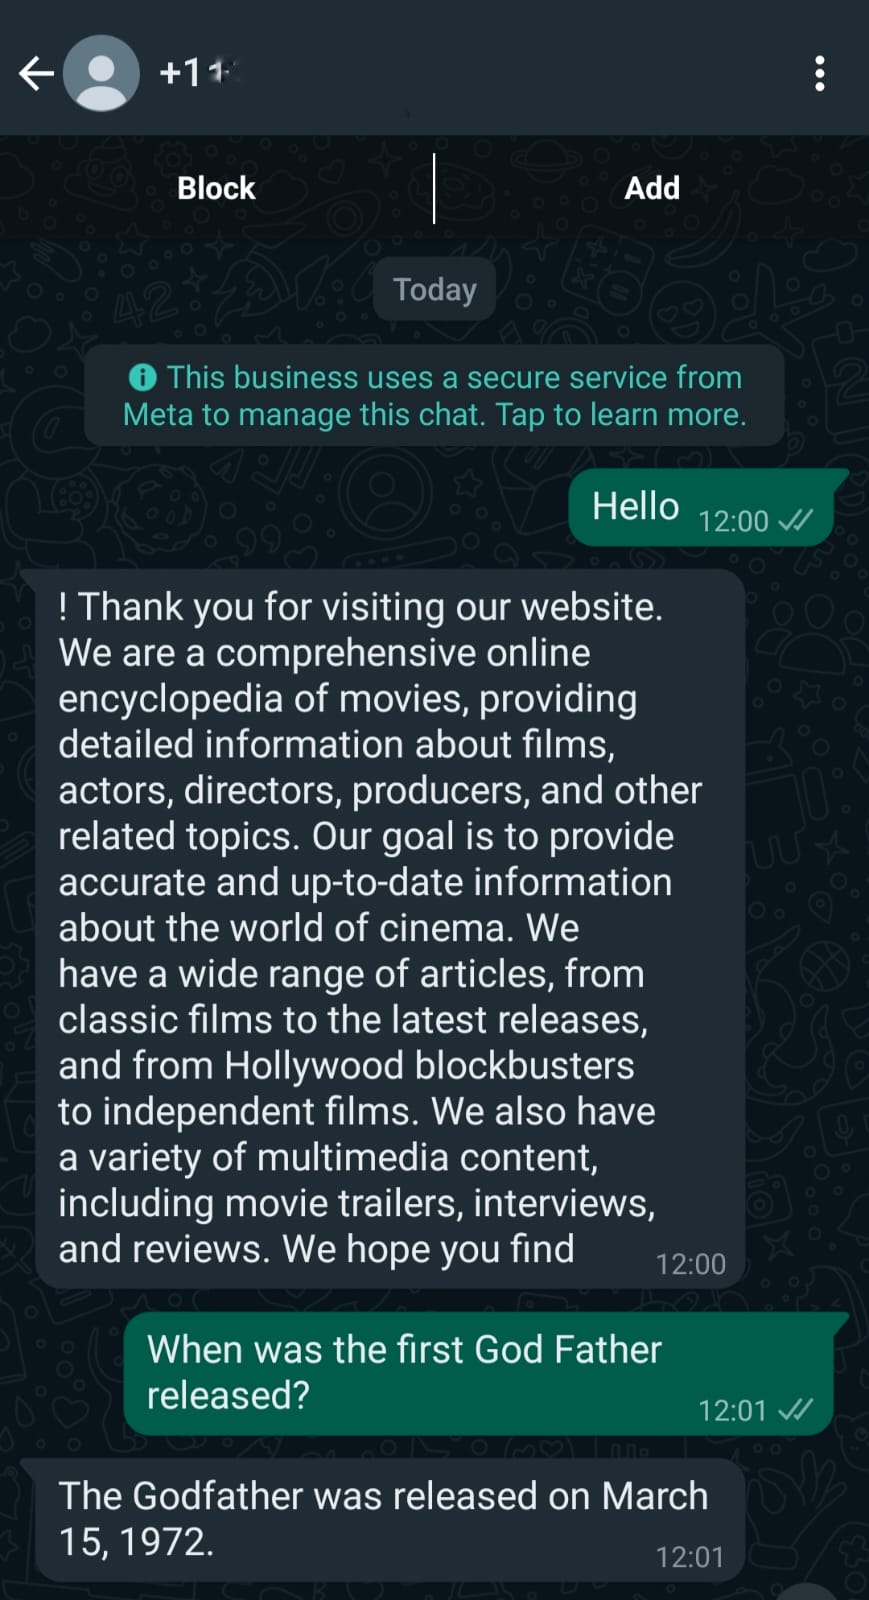
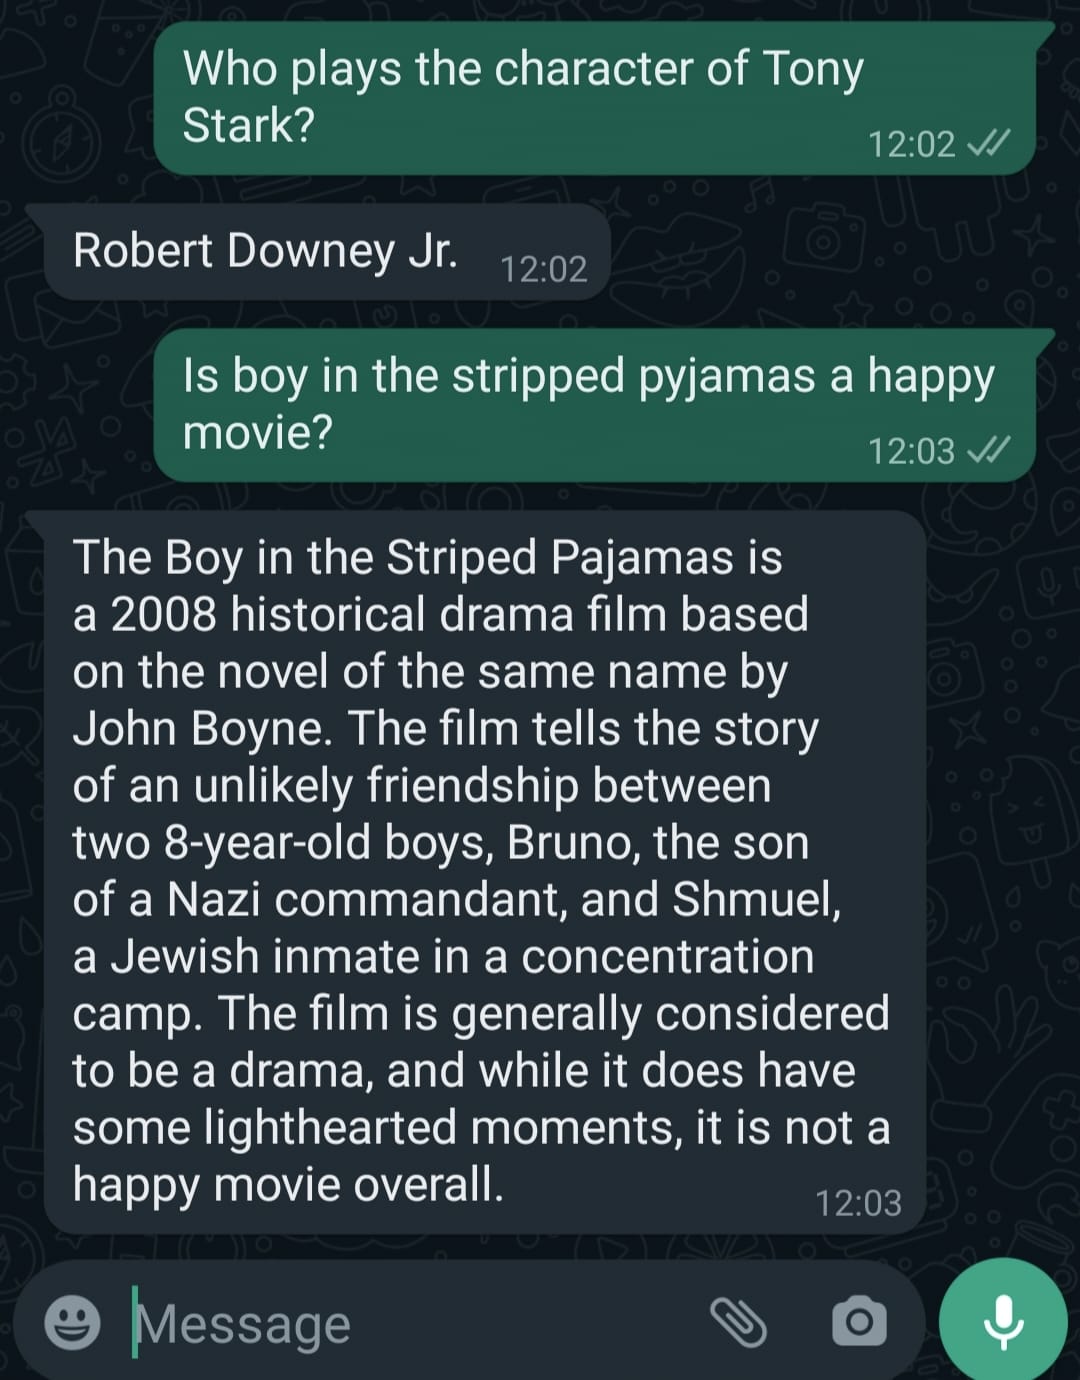
With the code in place, the setup is now ready to start interacting with the powerful OpenAI LLMs. To initiate a conversation, a message should be sent to the designated 'Test number' that was saved during the setup of the new Meta App. As one engages in a conversation, this WhatsApp chatbot will seamlessly integrate with OpenAI, leveraging its advanced language capabilities to generate intelligent and contextually relevant responses. The behavior of the chatbot can be fine-tuned by adjusting parameters such as temperature, max tokens, penalties, and even the LLM itself. While his exercise uses text-davinci-003 as its OpenAI model, any available OpenAI model can be used in its place. This conversation flow can be further refined to meet specific requirements and enhance the end-user experience.
Here are a couple of output examples of the chatbot deployed while creating this blog. In this exercise, the OpenAI model was instructure to behave as a “Wikipedia” of movies. Shown below is a sample conversation:
Conclusion
This blog demonstrates the steps to follow in order to build a WhatsApp chatbot which integrates the expressive capabilities of Express.js and OpenAI LLM. This serves as a first step to start benefiting from the full potential of intelligent conversations supported by AI-powered chatbots which have begun to revolutionize the area of automated human interaction.
The KansoCloud team has in fact implemented similar chatbots for our healthcare customers using Dialogflow (Google’s NLP service). The team is currently in the process of investigating the technical feasibility of using LLM (discussed in this blog) for such chatbots going forward.